Create 3D Pie Chart PDF Example iText JFreeChart Java Tutorial

In this post, we will provide a working Java Example code explaining how to create a 3D (3 Dimensional) Pie Chart using JFreeChart and stamp the chart into a PDF document using iText PDF API. This tutorial is similar to the one we described earlier to create a 2D Pie Chart in PDF file. The difference lies in the approach to create the chart, as we will be using a different method to generate the  3D chart. To generate a 3D Chart, the method createPieChart3D of class org.jfree.chart.ChartFactory will be used. The complete Java code for this example is provided below;
/* In this Tutorial, we will write some Java Code to create a 3D Pie chart and stamp the 3D Pie Chart into a PDF document */
/* This Tutorial uses JFreeChart and iText API for creating chart and generating PDF respectively */
import java.io.*;
import com.itextpdf.text.*;
import com.itextpdf.text.pdf.*;
import java.awt.Graphics2D;
import java.awt.geom.Rectangle2D;
import org.jfree.data.general.DefaultPieDataset; /* We will use DefaultPieDataset to define the data for the Pie Chart */
import org.jfree.chart.ChartFactory; 
import org.jfree.chart.JFreeChart;
public class PieChart3DExample {  
     public static void main(String[] args){
        try {
                /* To Create a 3D (3 Dimensional) Pie Chart using JFreeChart, we have to define the data range first */
                /* Total products by Brand Sold in the year 2008 */
                DefaultPieDataset my3DPieChartData = new DefaultPieDataset();                
                my3DPieChartData.setValue("Laptops", 1200);
                my3DPieChartData.setValue("HardDisks", 800);
                my3DPieChartData.setValue("Heater", 650);
                my3DPieChartData.setValue("iPAD", 1900);
                my3DPieChartData.setValue("iPhones", 1325);
                /* We have defined the data range for our pie chart, now we can create a 3D Pie Chart */
                /* This method returns a JFreeChart object back to us */                
                JFreeChart PieChart3D=ChartFactory.createPieChart3D("Programming - Pie Chart Example",my3DPieChartData,true,true,false);
                /* Stamping this Pie Chart inside a PDF document involves transforming this JFreeChart into 2D Graphics Object, which iText 
                can accept */                
                int width=540; /* Width of our chart */
                int height=380; /* Height of our chart */
                //Begin by Creating Document Object that will hold the 3D Pie Chart
                Document PieChart3D_PDF=new Document(new Rectangle(width,height));                 
                /* Create PDF Writer Object that will physically write the PDF file to File Output Stream */
                PdfWriter writer=PdfWriter.getInstance(PieChart3D_PDF,new FileOutputStream("Create_3D_Pie_Chart_Using_JFreeChart.pdf"));                
                PieChart3D_PDF.open(); //Open the Document for Writing
                /* Add some Metadata to identify document later */
                PieChart3D_PDF.addTitle("How to Add a 3D Pie Chart to PDF file using iText");
                PieChart3D_PDF.addAuthor("Thinktibits");                
                PieChart3D_PDF.addKeywords("iText,3D PieChart,JFreeChart,PDF,Example Tutorial");
                //To write new content to PDF access the direct content layer first
                PdfContentByte Add_Chart_Content= writer.getDirectContent();
                /* Create a template using the PdfContent Byte object */
                PdfTemplate template_Chart_Holder=Add_Chart_Content.createTemplate(width,height);
                /* Create a 2D graphics object and Rectangle object as before to write on the template */
                Graphics2D Graphics_Chart=template_Chart_Holder.createGraphics(width,height,new DefaultFontMapper());                
                Rectangle2D Chart_Region=new Rectangle2D.Double(0,0,540,380);
                /* Invoke the draw method passing the Graphics and Rectangle 2D object to draw the piechart */
                PieChart3D.draw(Graphics_Chart,Chart_Region);            
                Graphics_Chart.dispose();
                /* Add template to PdfContentByte and then to the PDF document */
                Add_Chart_Content.addTemplate(template_Chart_Holder,0,0);
                /* Close the Document, writer will create a 3D Pie chart inside the PDF document */
                PieChart3D_PDF.close();
        }
        catch (Exception i)
        {
            System.out.println(i);
        }
    }
}
This code produces a 3D Pie Chart inside a PDF document. A sample image that will be created as a chart is provided below;
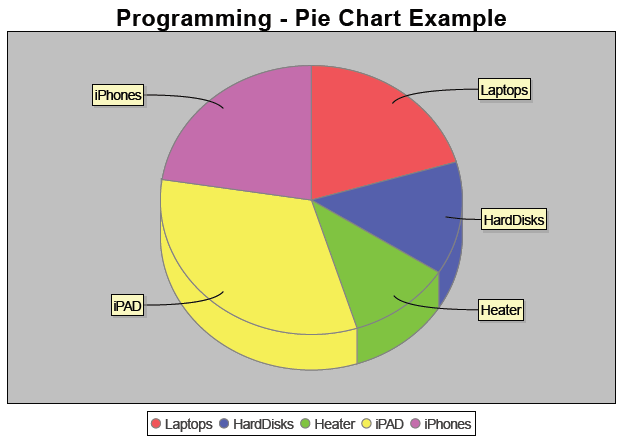
JFreeChart iText 3D PDF Pie Chart Example

IPL Final 2011 Full Match Highlights - CSK Vs RCB

Check below for the full match video highlights ; IPL final 2011 between Chennai Super Kings and Royal Challengers Banglore..Chennai triumphing to glory for the second time..Highlights running  for over 30 minutes.

Ajax JFreeChart Servlet Example - Java Tutorial

In our previous, we provided a HTML form which upon submitting invoked a Java Servlet to generate a dynamic pie chart (Using JFreeChart API) and provide it back to the user as a PNG image file.If you closely inspect the HTML code, you will come to know that it does a full page refresh every time it generates a PNG image. This is because, it submits the entire form data back to our servlet which returns a PNG image back to the browser. This is inturn displayed by the browser in the window. One approach to avoid this would be to use a Ajax XMLHTTPRequest to fetch the image back to the browser. Another clever way to do this is to invoke the servlet directly in the src attribute of the image.This will also avoid the full page refresh and the HTML form code to achieve this is provided below;
<html>
<head>
<title>Simple Ajax Example to Generate Dynamic Pie Charts Using JFreeChart</title>
<!-- Style Sheet to align the form elements on the page -->
<style type="text/css">
.right_aligned {
height: 10em;
line-height: 1.25em;
}
.right_aligned label {
display: block;
float: left;
clear: left;
width: 200px;
padding-right: 1em;
text-align: right;
}
.right_aligned select, .right_aligned input {
display: block;
}
</style>
<!-- This javascript function would be invoked when the user submits the form data. 
The function constructs a dynamic IMG tag, and pass the servlet 
information in the source (src) attribute, with the complete form post data.
Once this is done, the servlet will directly return the image back , 
which will be captured into the img tag  
Clever and avoids a full page refresh -->
<script language="Javascript">
function getquerystring() {
    var form     = document.forms['f1'];
    //gather form data into Javascript variables
    var word1 = form.Maths.value;
    var word2 = form.Physics.value;
    var word3 = form.Chemistry.value;
    var word4 = form.Biology.value;
    var word5 = form.English.value;
    //form data is converted into a post string, the values would be used to create a dynamic chart
    qstr = 'Maths=' + escape(word1) + '&Physics='+ escape(word2)+'&Chemistry=' + escape(word3)+'&Biology=' + escape(word4)+'&English=' + escape(word5);
    var res='<img src="servlets/servlet/PieChartServlet?'+qstr+'" />';//IMG tag is constructed here
    //set the DIV to the img tag 
    document.getElementById("imgHolder").innerHTML =res; 
}
</script>
</head>
<body>
<form class="right_aligned" name="f1">
<label>Maths</label><input type=text name="Maths"><br/>
<label>Physics</label><input type=text name="Physics"><br/>
<label>Chemistry</label><input type=text name="Chemistry"><br/>
<label>Biology</label><input type=text name="Biology"><br/>
<label>English</label><input type=text name="English"><br/>
<!-- invoke the javascript function written above when the form is submitted -->
<input value="Go" type="button" onclick='JavaScript:getquerystring()'>
</FORM><br/><br/>
<!-- The final chart will be created and displayed below -->
<div id="imgHolder"></div>
</body>
</html>
This tutorial showed  how to generate dynamic pie  chart with JFreeChart servlet and at the same time, avoid a full page refresh at the browser. You can replace the HTML code given in our earlier tutorial (refer link at the top) if you are keen to avoid a complete refresh.

Convert HTML to PDF with Servlet iText- Java Example - Part2

We are providing a tutorial to convert HTML to PDF dynamically using servlets, in the previous part of this post we saw how to write the server side code for our application. If you look at the Java Code, you will find that we are trying to read the FORM data that contains the HTML code snippet, and then use this input to show the converted PDF back to the user. That would mean, we need a HTML page from where we can pass the code for changing to PDF. Refer to a sample HTML code below;
<HTML>
<HEAD>
  <TITLE>Convert HTML to PDF Dynamically Using iText</TITLE>
</HEAD>
<BODY BGCOLOR="#CCFFCC">
<H2>Generate Dynamic PDF Document Using HTML Code Input</H2>
<!-- We invoke the Servlet for PDF generation -->
<FORM ACTION="servlets/servlet/HTMLtoPDFServlet"
      METHOD="POST">
Enter the HTML for Converting to PDF:<BR>
<!-- This Text Area obtains the input from User in HTML format -->
<TEXTAREA NAME="InputData" COLS=40 ROWS=6></TEXTAREA><BR>
<CENTER>
    <INPUT TYPE="SUBMIT" VALUE="Submit">
  </CENTER>
</FORM>
</BODY>
</HTML>
Now, this code shows up a FORM on the page as shown below;
Java Dynamic HTML to PDF Converter
Java HTML to PDF Converter  - HTML Page To Accept Code
Put this HTML file in your webserver in a place that is accessible by browsers.We have to do some configuration changes in the Tomcat server for us to invoke the servlet properly. The changes are listed below;
1) Load all the required JAR files given in Part 1 to lib folder.
(For example: Tomcat\apache-tomcat-7.0.14\lib). Also copy the class file to
your application path. 

2) Edit your web.xml file for configuring the new servlet.
    <servlet-mapping>
        <servlet-name>HTMLtoPDFServlet</servlet-name>
        <url-pattern>/servlets/servlet/HTMLtoPDFServlet</url-pattern>
    </servlet-mapping>

and
    <servlet>
        <servlet-name>HTMLtoPDFServlet</servlet-name>
        <servlet-class>HTMLtoPDFServlet</servlet-class>
    </servlet>

3. Bounce your Tomcat webserver once this is done.
We are now ready to test the code. When used the sample HTML code below, and clicked on submit, I got a PDF opened up on my browser.
<html>
<body>
convert HTML to PDF using itext library in Java - Servlet Based Example
<table border="1">
<tr><td>It Works!</td></tr>
</table>
</body>
</html>
A screenshot of the PDF file is provided below;
PDF Screenshot created by converting the HTML
Now, this is not complete. We will have to improvise the servlet code to do the following;
1) Capture Metadata from User and Stamp in XMP format in PDF.
2) Colors and Images..give a try to see if it works!
Let us discuss about this in upcoming tutorials.

Convert HTML to PDF with Servlet iText- Java Example - Part1

After providing a HTTP servlet that generated dynamic charts, we will now aim to write a Java Servlet that will accept a HTML string through a HTML page as an input, and then convert the HTML string fragment to a PDF file and return the PDF file back to the browser. This tutorial is essentially an extension of our initial HTML to PDF conversion tutorial using iText, but this time I want to make this conversion dynamic in nature. I would like to pass dynamic html string to the Servlet and get a PDF file each time I pass them, depending on my inputs. I would also like the PDF to contain some XMP Metadata information which I will be passing through a page (covered in later stages). The requirement sounds complex, but with iText and Flying Saucer and with a little knowledge of Java servlet programming, we can crack this in no time. We will begin with writing a servlet and then design our HTML input page and finally blend these two together to see our code in live action. We can get started with this step by step guide now. [ Note: We will use a basic HTML as an example, without CSS and Images. But, using CSS and Images in your HTML file will be explained at a later stage in the tutorial ]

A commented servlet code that converts the HTML to PDF using Java is provided below;
import java.io.IOException;
import java.io.OutputStream;
import javax.servlet.ServletException;
import javax.servlet.http.HttpServlet;
import javax.servlet.http.HttpServletRequest;
import javax.servlet.http.HttpServletResponse;
import org.xhtmlrenderer.pdf.ITextRenderer;
import com.lowagie.text.DocumentException;
import java.awt.Color;
/* This Servlet accepts a HTML String Fragment and Converts it into PDF file
Using iText and Flying Saucer */
public class HTMLtoPDFServlet extends HttpServlet {
public HTMLtoPDFServlet() {
/* For this example, the constructor does nothing for us */
}
/* We use a doGet method and invoke it internally from a doPost */
public void doGet(HttpServletRequest request, HttpServletResponse response)
throws ServletException, IOException {
        OutputStream out = response.getOutputStream(); /* Get the output stream from the response object */
        try {
                /* Set the output response type */
                /* If the below property is not set, the browser will simply dump the PDF as a text file as an output */
                response.setContentType("application/pdf"); /* We have to set this response type for the browser to open the PDF properly */            
                ITextRenderer renderer = new ITextRenderer();
                /* Accept the input provided by user in the HTML form */
                renderer.setDocumentFromString(request.getParameter("InputData"));
                renderer.layout();              
                /* Write the converted PDF output to the output stream */
                renderer.createPDF(out);                
        }
        catch (Exception e) {
                e.printStackTrace(); /* Throw exceptions to log files */
        }
        finally {
                out.close();/* Close the output stream */
        }
        }
/* The doPost method provided below would be invoked when you 
post the data in the HTML form (that contains a HTML string) to
the servlet. With this HTML form, we will invoke doGet and convert the 
HTML string to PDF file */
public void doPost(HttpServletRequest request,
                     HttpServletResponse response)
      throws ServletException, IOException {
    doGet(request, response);
  }     
}
Now, this servlet supports a post method, through which we can obtain the incoming HTML snippet from the FORM data. Once we get this information, we can use iText and Flying Saucer API to write the converted PDF file to the output stream. We have the servlet code on hand, to compile this code, you will need the following JAR files;
servlet-api.jar
core-renderer.jar
core-renderer-minimal.jar
xml-apis-xerces-2.9.1.jar
iText-2.0.8.jar
You can also use higher versions if available, but make sure that you change your import declarations accordingly. In the next part of this post, we will see how to setup this servlet in Tomcat and create a HTML page and generate dynamic PDF on the fly.

JFreeChart Dynamic Pie Chart Example Java Servlet Tutorial

We have been discussing how to invoke JFreeChart using a Java Servlet and paint the resulting chart on the browser for sometime now. In the examples discussed so far, the charts created were static in nature; i.e. the servlet was not able to accept user inputs and generate dynamic chart as an output. In this post, we will provide dynamic inputs to our chart servlet using a HTML form and use the user provided inputs to return a chart object back to the browser. In order to do this, we will first create a simple HTML form as shown below, that accepts the marks obtained by a student in five different subjects. Refer to the code below, that shows how to create the HTML form;

<html>
<head>
  <Title>Generate Dynamic Pie Chart with JFreeChart and HTTP Servlet</Title>
</head>
<body BGCOLOR="#CCFFCC">
<H2>Enter your marks to get a Pie Chart Generated with JFreechart API</H2>
<!-- We create a simple form to accept user inputs -->
<!-- The action for this form points to the servlet URL created in earlier posts -->
<FORM ACTION="servlets/servlet/PieChartServlet" METHOD="POST">
Maths:<INPUT TYPE="TEXT" NAME="Maths"><BR>
Physics:<INPUT TYPE="TEXT" NAME="Physics"><BR>
Chemistry:<INPUT TYPE="TEXT" NAME="Chemistry"><BR>
Biology:<INPUT TYPE="TEXT" NAME="Biology"><BR>
English:<INPUT TYPE="TEXT" NAME="English"><BR>
<INPUT TYPE="SUBMIT" VALUE="Submit">  
</FORM>
</body>
</html>
You will have to copy this html to a convenient place in your tomcat webserver.A screenshot of this HTML form is provided below.
Dynamic Pie Chart with JFreeChart
HTML Form Used to Create Dynamic Pie Chart Using JFreeChart
Now, when you click on Submit Order (i.e. request, renamed in the HTML code), the Servlet written in our servlet tutorial will accept the values entered in the page and send a dynamic pie chart back to the browser , after generating it in JFreeChart. Since we are posting data in the form to the servlet we have to modify the servlet code slightly to have a doPost method. The servlet should accept the form elements and use them to create a chart now. A modified servlet code to meet this requirement is provided below;
import java.io.IOException;
import java.io.OutputStream;
import javax.servlet.ServletException;
import javax.servlet.http.HttpServlet;
import javax.servlet.http.HttpServletRequest;
import javax.servlet.http.HttpServletResponse;
import org.jfree.chart.ChartFactory;
import org.jfree.chart.ChartUtilities;
import org.jfree.chart.JFreeChart;
import org.jfree.data.general.DefaultPieDataset;
import org.jfree.chart.labels.StandardPieSectionLabelGenerator;
import java.awt.Color;
import org.jfree.chart.plot.PiePlot;
/* Code for the HTTP Servlet that will return the Pie Chart as a PNG image
back to the browser after generating it using JFreeChart API */
public class PieChartServlet extends HttpServlet {
public PieChartServlet() {
/* No code in the constructor for this demonstration */
}
public void doGet(HttpServletRequest request, HttpServletResponse response)
throws ServletException, IOException {
        OutputStream out = response.getOutputStream(); /* Get the output stream from the response object */
        try {
                DefaultPieDataset myServletPieChart = new DefaultPieDataset();
                /* We will now get the values posted to us from the HTML form, to generate a dynamic pie chart */
                /* to get the form values we use request.getParameter method. We have to convert this to Double format to 
                pass this as an input to our pie chart*/
                /* The NAME used in HTML form will serve as input to getParameter */
                myServletPieChart.setValue("Maths",Double.parseDouble(request.getParameter("Maths")));
                myServletPieChart.setValue("Physics", Double.parseDouble(request.getParameter("Physics")));
                myServletPieChart.setValue("Chemistry", Double.parseDouble(request.getParameter("Chemistry")));
                myServletPieChart.setValue("Biology", Double.parseDouble(request.getParameter("Biology")));
                myServletPieChart.setValue("English",Double.parseDouble(request.getParameter("English")));        
                JFreeChart mychart = ChartFactory.createPieChart("HTTP Servlet - Dynamic Pie Chart Example",myServletPieChart,true,true,false);
                /* We use the configurator to define labels for the chart, which can be shown on image also */
                PiePlot ColorConfigurator = (PiePlot) mychart.getPlot();
                ColorConfigurator.setLabelGenerator(new StandardPieSectionLabelGenerator("{0}:{1}"));
                ColorConfigurator.setLabelBackgroundPaint(new Color(220, 220, 220));  
                response.setContentType("image/png"); /* Set the HTTP Response Type */
                /* Send a big chart back to the browser */
                ChartUtilities.writeChartAsPNG(out, mychart, 640, 480);/* Write the data to the output stream */
        }
        catch (Exception e) {
                System.err.println(e.toString()); /* Throw exceptions to log files */
        }
        finally {
                out.close();/* Close the output stream */
        }
        }
/* We write a doPost method which will be invoked when you post data to the servlet */
/* Inside doPost we invoke doGet to return a chart back to us depending on the input parameters*/
public void doPost(HttpServletRequest request,
                     HttpServletResponse response)
      throws ServletException, IOException {
    doGet(request, response);
  }     
}
You will have to compile and deploy this new servlet. You can refer to the JFreeChart Servlet Tutorial to know how to do this, if you are using Tomcat server. After you deploy the new version of servlet code, when you send values from this form, each time you will get a different chart displayed on the browser..Wow! we have created dynamic charts using JFreeChart Servlets. A sample chart produced for some random inputs is provided below;
JFreeChart Dynamic Pie Chart Using HTTP Servlets